Stock Up and Save Everything for Baby at Walmart.com!
e.l.f. cosmetics
Showing posts with label food. Show all posts

Sunday, August 14, 2016

The Experiment

Happy Sunday, dear readers.

Success! You CAN mix meat and veggies in a pita!


Last night, I decided to try something new. I knew I was gonna make a pita, but I wasn't sure how it would turn out. The reason for this doubt was because I was making pita with both meat and vegetable filling. While meat, vegetable, as well as cheese are common pita fillings, I've never seen meat and vegetable combined in a pita filling before. I had ground beef and spinach, and I wanted to use that for my pita.

Unsure, if anyone else had made a meat and spinach pita, I consulted the oracle known as Google for help finding a recipe. There was nothing in English, and when I searched the Serbian-language net, I did find one recipe for meat and spinach pita from Montenegro. I thank God for giving me the inspiration to watch cooking tutorials in Serbian because even though I've never been particularly proficient in the language, I now could read and follow a recipe in a language other than my dominant English. I looked at the ingredient list and though I had almost all the ingredients the recipe called for, I did not have sour cream. No matter, I would substitute a cup of milk instead.

There was one other novelty I was trying out with this pita. While at the swap meet a few weeks ago, I bought a 10x10 Corningware casserole baking dish with a lid. I'd washed it and was now ready to test it out with my pita. I intended to make the pita on my barbecue after the resounding success of my most recent attempt, but a summer storm blew through and not only put the kaibosh on that plan, but it cooled down the temperature enough to where I could run the oven inside and not turn my home into a furnace.

Using my handy dandy cast iron pan, I browned the meat, onion, and garlic. For spices, I added salt, pepper, a dusting of paprika, and a pinch of turmeric to enhance the flavor of the beef. I added the spinach last, but not before roughly chopping it. In the last pita I made using spinach filling, I didn't alter the spinach and I didn't like the way it lay for the filling. I decided to try the chopped spinach to see how well it lay in the filling. All this went into my mixing bowl filled with milk and beaten eggs.

Assembling the pita itself was actually much easier in this casserole dish than it was in the old recycled aluminum cinnamon roll tin I'd been using previously to bake pitas. The casserole dish is square, and the rectangular fillo dough sheets lay much better in that than in the round aluminum tin. I didn't even need to use that much oil to grease the fillo dough sheets between layers. Sure enough, the chopped spinach lay in the folds of fillo much better than they previously did. It wasn't until after I'd popped the pita into the oven that I realized I forgot to add the baking powder to the filling. To be fair, though, until recently, I had no idea that baking powder was used in pita filling. Growing up, nobody I knew used it. Baking powder helps the fillo dough puff up some, so that the pita isn't so dense.

After baking for about an hour or so until the top was a gorgeous golden brown color, it was time to answer the ultimate question: how did this pita turn out.

A better shot of the fillo and filling


The answer: delicious! The outsides were nice and crispy, the inside was nice and tender, and the filling wasn't too dense either! Having a dairy product in the filling definitely helps. Next time, though, I will add the baking powder. I may or may not use the sour cream too, given how satisfied I was with the milk, but if I get some, I'll use it just to see how it compares. But that casserole dish was a wonderful investment. For $10, I leveled up my pita baking to a whole new level. I don't have to be ghetto about my baking equipment anymore! Also, this pita confirmed that despite being somewhat rare, you CAN mix meat and vegetables in a pita filling, and it will come out tasting delicious.

I've almost gotten my pita making technique down pat. Thank you for bearing with me while I figure out how to make this classic dish from my ancestors.

Thank you for reading this post and please don't forget to share, comment, and subscribe!

Friday, August 5, 2016

Success!

Hello everyone!

I reached a very important milestone yesterday on my journey to becoming a good cook. For the first time, I successfully baked a pita in my bbq! I made a meat pita because thanks to that damned power outage on Monday, the fillo dough and half-pack of ground beef were thawed out and needed to be eaten.

Mekike


I'd spent the morning making mekike, a kind of Serbian fried bread snack similar to a doughnut, using a Serbian-language recipe I borrowed from my favorite Serbian-language Youtube cook, Jelajelena Petrovic. However, I knew that for the pita, I was gonna have to cook it outside because I didn't feel like heating up the kitchen a second time to brown the meat. It took quite a bit longer to brown the meat on the grill than it would on the stove. I think it was my coals because this was the second time I was using them. I normally reuse coals when I barbecue because it stretches the supply of charcoal that I have, and out of a batch, I can usually get two or three grill sessions out of it before they're too spent to be used.

Though it was much better this time around than the last pita I tried baking on the bbq, there were a few minor mishaps with this pita. The first mishap was that I'd forgotten to add a spot of oil to my cast iron pan to fry the onions and garlic before adding the meat. I normally wouldn't forget this, but having one arm full of baby and the other holding my cast iron frying pan filled with meat, garlic, onion, and spices, it completely slipped my mind. Good thing the ground beef I was using was 80/20, so it wasn't too lean and there would be fat runoff from the cooking process.

The second mishap was that I ran out of fillo sheets! I thought I'd have enough, but as it turned out, I didn't. My husband then informed me after I mentioned this that the half-pack of ground beef I'd cooked was two pounds, not one like I thought it was. Now, I know for sure that it's one pound of meat per one roll of fillo dough. My husband didn't mind it, though. He's not crazy about breading.

Finally, the third mishap had to do with the coals. Aside from the low heat level coming off of them when I was browning the meat, they actually went out during the baking process! When I went outside about 20 minutes after setting the pita to bake in the barbecue, I saw that the coals had gone out and so I had to take everything off the grill and light a fresh batch. Once this task was completed and everything was put back on the grill to bake, I'd intended to come back out 20 minutes later to check on the pita.

Except, I fell asleep.

I was feeling tired and thought I'd close my eyes for a few minutes to recharge, and wound up dozing off for an hour or so. When I woke back up and realized how long I'd been asleep, I suddenly remembered that I still had that pita on the bbq! I thought for sure it was gonna be an inedible hunk of charcoal, but to my great relief, I saw the nice golden crust of pita when I took the lid off the grill to have a look.

Taken the next day. Yes, I had to eat some of it. I couldn't resist my creation


While there was a bit of charcoal smoke flavor in the top layers of the pita, the dish actually tasted pretty well. The simple spices of paprika, salt, and pepper all blended nicely with the flavor of the fillo dough. It actually didn't come out that greasy either, despite my accidentally pouring glops of oil on the fillo and the bottom wasn't terribly burned either. It was nice and crispy on the outside while tender on the inside, like a good pita should be.

My meat pita from the inside. I ran out of fillo dough and basically did a giant meat dump on the last layer before covering it. It still tasted good, though.


Despite the few mishaps, I was so happy that my pita came out so well. Now, I can try baking something else. My family and I went to the swap meet tonight and I bought a small square casserole baking dish that was sorely needed (I was hoping to find a 9x13 baking dish, but no one had it. I did notice an awful lot of small crockpots, though). I think maybe I'll make lasagna next. My husband would like that, though I'm not sure how to get past the cheese hurdle(I don't like ricotta cheese and he can't eat melted cheese). Time to do a little research on this...

Thank you for reading this post and please don't forget to share, comment, and subscribe!

Thursday, July 21, 2016

Some Updates

Hello dear readers!

As you may have noticed, things have been a little quiet here on the blog. This has largely been due to husband being out of town for a few days at a time over the course of these past two weeks. His job sent him to a small town near the US-Mexico border and with him not home to watch the baby while I cook and clean, I just haven't had the time or energy to write. One good thing about his business trip is that my husband got to stay in a historic hotel. A friend recommended the restaurant in the hotel's lobby, which my husband ate at and approved of mightily. It's said to be haunted (the front desk lady told my husband that an entity from the hotel followed her home and tried to strangle her in her sleep, and the colleague my husband was rooming with in the hotel room woke up in the middle of the night screaming from a terrifying nightmare. Coincidence? You decide...), but my husband hasn't seen or felt anything out of the ordinary. His demon-meter is fine tuned, but he's also well protected by the Lord.

Boo!


I also have an update on the car. It appears that the bothersome electrical short which caused spluttering upon acceleration and prevented us from going up our friend's very steep driveway for fear of burning through yet another set of wires when going over to visit her, has finally been fixed! My husband, while diligently looking over the wires in both the engine and the dash, discovered where the insulation had worn off in some wires leading to the wiper blades. He fixed it and the car seemed to behave for a few days, even with him being a leadfoot. A few days ago, he went to visit our friend on the hill and made it up her beastly driveway with no splutter or fried wires. I still get nervous going up her driveway, but now I don't have to walk up it anymore.


Also of note, I've been getting to exercise my cooking skills lately. I made some more pita breads, this time using whole wheat flour, and I rolled them to be very thin, just like how my hubby likes them. They weren't fluffy like what I'm accustomed to seeing with pita bread, and were actually quite dense. I wonder if this is characteristic of whole wheat flour, or if I didn't let the dough rise enough, but I'll try again sometime soon. Also, after collecting the last of the harvest from our tomato garden (the damn things went absolutely gangbusters!), I made homemade tomato sauce from the overripe and sun-scarred tomatoes in the colander my hubby was using to hold them. I also used plenty of fresh basil from the garden (another plant that has a tendency to go gangbusters out here), but I used too much initially and had to take out most of the leaves once the sauce had cooked down. Once it was cool enough, I jarred the sauce up and put it in the freezer. It'll make for excellent pizza sauce or spaghetti sauce once I get around to making these respective dishes.

We knew this was inevitable. Pennywise Trump finally got his coronation and shattered the GOP while doing it


Finally, if anyone cares to know, I have been keeping up with the dumpster fire known as the Republican National Convention. Like most apolitical people, I've been kicking back with my beer and popcorn, watching the shitshow rage on. I despise the walking ballsack called Ted Cruz for a whole host of reasons, but I will give him due credit for doing the equivalent of defiantly sticking his middle finger right in front of the GOP's face at the Donald's coronation. But then again, I've always subscribed to the idea that Donald Trump isn't in it to win the presidency, he's running as a troll Republican to destroy the GOP and clear the way for Hillary. I don't support Hillary for a whole host of reasons, but she's much more qualified to run this country than Trump. Besides, if she's elected, then we won't have to flee to Mexico to escape the coming hell that is a Republican presidency. Bernie did what he was supposed to do and pulled her to the left.

Thank you for reading this post and please don't forget to share, comment, and subscribe!

Friday, July 8, 2016

The Pita Breads

Good evening, dear readers.

After a fulfilling afternoon spent helping a friend and former neighbor fix up a trailer for her son, I had a hankering to make some more bread. Bread making, as I've come to figure out, isn't that hard. It can be time consuming, yes, but you're letting chemistry and physics do most of the work for you.

Playing with the curtain door at our friend's home


Since we had some leftover hummus in the fridge, I decided that pita bread was in order for dinner. Thanks to that amazing culinary school known as Youtube cooking tutorials, I found an easy and not-so-time-consuming recipe for Greek pita bread from my favorite Greek chef, Akis Petretzikis. I didn't have any fresh thyme, which the recipe called for, but since we have loads of Italian seasoning which we've acquired from moving inheritances and trailer cleanouts, I used that instead. It had thyme in it.

After kneading, rolling flat, and grilling them in my trusty cast iron pan on medium heat, the resulting pita breads were absolutely divine. They were soft and tasty with a bit of crisp on the outside. Since they were homemade, the pita bread loafs were different sizes and thicknesses, which gave them some variety. The Italian seasoning I added to the dough made a tremendous difference and gave the breads a very nice aroma in addition to a subtle taste. My husband really liked the pita breads too as he broke apart the piece and dragged it through the hummus.

My beautiful pita breads (note: I have no idea why the image is rendering sideways. It was taken right-side up!)


Akis was right: once I made homemade pita bread, there's no going back to store bought. It didn't even take that long to make, from activating the yeast to plating the finished breads, it took probably about an hour and a half total. It was a breeze compared to English muffins, which when made fresh is pretty much a whole-day affair.

Thank you for reading this post and please don't forget to share, comment, and subscribe!

Sunday, July 3, 2016

The English Muffins, Part II

Happy Sunday, dear readers!

Earlier this past week, I bought a jar of fresh yeast to replace the bag of yeast that had been sitting in my fridge for at least a year and a half. The first thing I tried making with that bag of yeast was English muffins, but they came out dense. Unable to pinpoint exactly where I went wrong, I decided to try making something else with the yeast. I settled on a pita bread recipe from Youtube, but when I tried activating the yeast, it wouldn't activate. I knew then that the yeast was bad and that I needed to get some more if I was gonna try making any bread recipes. Once is an anomaly, but twice is indicative of a systemic failure. Almost by chance, however, I discovered at the store that the kind of yeast I'd been given wasn't the normal dry active yeast used by the chefs in my Youtube tutorials, but bread machine yeast! It also goes bad after six months if it's not used up before an expiration date. I had no way of knowing this information beforehand, and there's no telling how long the family friend who gave me the yeast had it sitting in her pantry.

All ready to cook! Yes, I wrecked one, but it still came out tasting good


So with my fresh new jar of regular dry active yeast, I decided to give the English muffin recipe a second go. It was literally night and day working with really activated yeast. The starter sponge looked, well, like a sponge and when I set the dough on top of the dresser to rise, it REALLY DID RISE! It definitely doubled, and then some. Kneading the divine-smelling dough was much easier too, and it blew my mind how big the dough balls were once they'd finished proofing. They actually touched! I also used a fresh bag of flour that hadn't been hijacked by bugs, so I think that helped too.

I did make two small errors during this little endeavor. The first error came when I cut the dough into smaller pieces to roll: I forgot to put some flour down on a second plate that was needed when I was arranging the dough balls to proof. The dough balls on the second plate wound up not only expanding to be touching each other, but they also stuck to the plate's surface and wound up kinda misshaping the muffin a bit when I put them in my trusty cast iron skillet to fry. The other error I made was when I cut one of the dough balls in half because I hadn't realized how big the balls would be once they had finished rising, and deflated it. Oops! Needless to say, I left the other dough balls alone. They were about 2-3 times the size of the store-bought English muffins.

All done! Yeah, they don't look much like English muffins, but that's ok. I'm still learning this shit


I changed one other thing from the first time I made these English muffins. This time, I fried them in butter instead of olive oil. Even though I'm notoriously bad at this, it sometimes pays to read and follow the instructions in the recipe exactly as they're written.

Finally, the moment of truth came after my fresh batch of English muffins had cooled down enough to be handled. My husband insisted on using a knife to slice open the collapsed English muffin to toast and butter it. It was almost a complete 180 from the first English muffins I made. These were tasty, fluffy, held in the heat well and had a significant number of nooks and crannies! My husband was delighted with the result, even if this second batch was bigger and more misshapen than the store bought English muffins I was accustomed to seeing.

Look at that fluffy, buttery goodness! If my husband had been civilized and used a fork to separate the halves of the English muffin, I think the nooks and crannies would have been more obvious


Needless to say, this recipe is a keeper. Now that I have a better idea of how big everything is gonna get, I can either cut smaller pieces of dough or I can make a big batch of proofed dough balls and then freeze them, taking out only what I'd need to make English muffins for a weekend breakfast or something the next time I feel up to making these. I now feel very confident that I can try making other bread recipes.


Thank you for reading this post and please don't forget to share, comment, and subscribe!

Saturday, July 2, 2016

The Upgrade

Good evening, dear readers.

Today, my kitchen received some much-needed upgrades. For a while, we've been lacking in a few kitchen basics like a liquid measuring cup, baking sheets, a rolling pin, a whisk, and a 9x13 casserole dish. We've made-do without them, but since I've been taking a more active role in meal prep now that my husband has to work, cooking becomes a real bitch when you don't have the proper tools for the job.

Since we needed a few non-food items at Walmart, I got my kitchen tools. I even got a small Teflon-coated pan for when I make palacinke! The only thing from my list that I didn't get was the casserole dish, but only because our neighbor down the street was having a yard sale and my husband saw that she had bakeware for sale.

My new starter. It works beautifully


Even though the kitchen arsenal upgrade was great, the best upgrade I got today was a proper charcoal starter! My mom sent my husband a gift card to Home Depot for his birthday, and we used that to get my starter (as well as some needed hardware). I was happy because now I could light my charcoal in a relatively safe and effective manner as opposed to using the propane stove and risking burns during the transfer of the charcoal from the stove to the grill. Before we were married, I remembered that my husband had a small charcoal chimney starter which he used periodically for when he wanted to barbecue something, but his birdbrained roommate threw it away while she was cleaning his room (she insisted on it because she was attracted to him for all the wrong reasons). Now that we had a proper replacement of that doomed starter, it was time to break it in. Good thing I had thawed out some pork chops and a bit of ground beef. Baked beans were on the menu too!

The starter itself was pretty straightforward to use and easy to light. I'd seen Youtube chefs use chimney starters for barbecuing, so it wasn't hard for me to copy them. After all, it's not difficult to stuff old newspaper underneath the wire mesh separating the charcoal hopper from the lighting chamber. Some old grocery fliers were put to use as well as plenty of the hard-to-light wood charcoal I've been using. It took about 15 minutes or so before the coals were ashed over enough to be dumped into the grill. The handles were a bit hot, but I had some wet rags to help me grip them.

Sure enough, the starter did its job well. The coals were lit and put to use in a shorter amount of time than it would have taken to do the same job on the propane stove+transport to grill. I didn't even nearly-burn myself like last time.

Kickin' it old-school. I even remembered to add the molasses this time!


In characteristic fashion, I proceeded to barbecue my pork chops, some vegetables, and then cook the pot of beans on the grill. There's something relaxing about just kickin' back and letting the hot coals cook a pot of baked beans. It brings to mind old West cowboys around a campfire, relaxing and making their food.

Tomorrow I'm gonna retry making English muffins. I bought a jar of fresh yeast earlier this week and so I'm itching to test it out.

Thank you for reading this post and please don't forget to share, comment, and subscribe!

Thursday, June 30, 2016

The Pita

Hello, dear readers!

Today, I was feeling ambitious. I decided to try out my bbq as an oven by making some pita.

I got the idea for tonight's dish from a Serbian-language cooking tutorial I saw from my favorite Youtube grandmother, Jelajelena Petrovic, called "Pita sa Spinacem" (Spinach pita). I knew when I watched her video that I had to try making this, but I hesitated because my husband views cheese as though it's the spawn of Satan. After I asked him whether or not he'd eat a spinach pita if I made one, knowing that it had cheese in it (I resolved to use feta, since it was the closest to what I observed the Serbian cheese used in the video to be) and receiving an answer in the affirmative, I then set about procuring the ingredients I'd need. The one conniption I had was whether we had suitable bakeware for the pita, but after digging around in the cabinet where we keep the pots and pans, I found an aluminum pie pan which originally housed a tray of cinnamon rolls from the store. My husband had saved up a few of those to reuse, and it was big enough to fit on the grill.

Baking the pita on my grill


Thank goodness it rained this afternoon, so the ground was nice and wet. I cleaned out the old crappy coals from the barbecue and after putting in a few fresh ones, I decided to light them using some paper towels soaked in cooking oil thanks to another Youtube tutorial I saw (I refuse to use lighter fluid because then the food tastes like it). It took a few sheets to get the coals going, but I finally got them lit. My husband was whining at me to use the propane stove, but I refused because I didn't want to burn myself during the transfer.

Unfortunately, I didn't take pix of the process because the baby was being exceptionally clingy and was throwing a crying tantrum because my making the filling and assembling the pita meant that I couldn't pick her up and hold her like she wanted me to. I was able to hold her while I fried the onions, garlic and spinach over the hot coals, but once the pita was assembled and on the grill, she went and nursed herself to sleep. Her tantrum had worn her out.

Pitas, as I alluded to in an earlier post, are classic Serbian food and generally don't require much in the way of effort to make. It's an ideal quick-n-dirty meal that can be thrown together in about an hour or so to feed a hungry family or party guests. I wasn't sure how it would taste, given that the coals are made of wood and tend to impart their flavor onto foods, but I was happy to give it a try since I was trying to avoid using the oven at all costs. After I put the pita on the grill to cook, I realized later that I'd forgotten to add milk to the filling. This minor error proved to be providential because as fate and the fickle monsoon weather would have it, another storm blew in and I had to cut the bbq baking time short so that I could take the pita inside. The milk in the filling would have made the fillo dough soggy and rendered it inedible at that stage.

My grandmother would call this "dead"


Despite being undercooked, the pita was cooked enough to the point where you wouldn't get food poisoning from eating it. And actually, it wasn't bad! Only the top layers of the fillo dough carried any hint of charcoal flavoring from the grill, but it wasn't bad. It blended nicely with the rest of the ingredients. When my husband woke up from his nap, he saw the dead pita and finished it off in the oven's broiler. Ironically, he rendered the feta cheese inedible to his standards when he did that because while the top was golden brown, the cheese melted and set off his gag reflex. I was disappointed because now it meant that he wouldn't eat my pita. My husband was also disappointed because he liked the taste, but he couldn't eat melted cheese cuz the texture triggers an adverse reaction in his throat (I think he's allergic to cheese, but it only happens when the cheese is cooked). We'll see about breakfast, after everything is nice and solid.

After a quick stint in the broiler. Much better

Would I do this again? Yes. I have another roll of fillo dough set aside for this purpose. Next time, however, if I can't use more spinach, I'll use half as much feta cheese. I'll also remember to add the milk to the filling, but I think the spinach could stand to have a good chopping so that it would fit easier in the folds of the dough. Also, I'll figure out a way to get the grill to light hotter so that my pita will bake properly. Despite the storm throwing off my timing, I'm genuinely pleased with how this came out. It was much better than my burek.

Thank you for reading this post and please don't forget to share, comment, and subscribe!

Saturday, June 25, 2016

The English Muffins

Greetings, dear readers. It's been a busy couple of days. Thursday was my husband's birthday and we celebrated with some good Benedictine beer and fried chicken from our favorite chicken joint. Simple celebrations are always the best.

On Tuesday, I broke new ground and made English muffins. I enjoy English muffins, but the ones from the store leave much to be desired. So, when I came across an easy English muffin recipe on Youtube, I knew I had to give it a try.

About a year and a half ago, I was given a small cup full of yeast by a family friend. I kept it in my fridge to keep it cool since the pantry in our kitchen where the baking goods are stored tends to get kinda hot in the summer and I didn't want any bugs or heat to get at the yeast and ruin it. I've been itching to make something with it to see if it's still good, so I figured English muffins were a good starter.

Activating the yeast

The dough before rising. It was sticky and wet


I first activated the yeast, then mixed the dough using my giant salad bowl as a mixing bowl and my sifter to get the bugs out of the flour (I honestly have no idea where those weevils are coming from. I vacuum out my pantry once a month and yet they still come!). After letting the dough rise, I made the mistake of not flouring the counter  enough so the dough was leaving a sticky mess. I added alot more flour and that solved the mess, but now it was too dry and I had to add a little water into the dough to moisten it a bit more. After separating and forming the muffins, I coated them in cornmeal and put them off to the side to proof. While the recipe called for using butter to fry the muffins, I used olive oil instead because it was healthier than butter. I fried up the English muffins in two batches, using my handy cast iron pan.

I set the dough to rise on top of the dresser in the bedroom, since that was the warmest place in the house. Unfortunately, I didn't take any pix of the dough after it was doubled.

Frying the English muffins

I put an egg yolk wash on top of the muffins to use up a leftover yolk. I don't think I should have done that cuz it made the English muffins look burned.


How did my muffins come out? Bad. I don't know where exactly I went wrong, but the resulting English muffins were dense and tough. My first reaction was to wonder if the yeast had gone bad, (especially since I couldn't obviously tell if the dough had doubled at all during its rising stages) but the second batch of English muffins were definitely fluffier than the first batch, so bad yeast may not have been the culprit. That being said, however, the yeast may not have activated well. I didn't cover the bowl when I was activating the yeast, since the recipe didn't make mention of it, though in some other videos I watched about making bread, I noticed that just about every other cook covered the bowl to let the yeast activate.The possibility of overworking the dough also occurred to me, though I doubt that because breads in general need alot of kneading to smooth them out.

All done


My husband suspects the dough's temperature at cooking time to be the ultimate culprit because after the muffins had finished proofing, I put the dough in the fridge because it was the late afternoon and it was getting to be kinda hot in the house. I put the dough in the fridge to keep it from going bad cuz I knew it was gonna be a few hours before the house was cool enough to cook in. At cooking time, I basically took the dough out of the fridge and put it in the pan without letting it warm up.

Batch 1: dense, felt underdone; note the lack of nooks and crannies classic of English muffins

Batch 2: A little better, but not by much. Some nooks and crannies present, but still pretty dense


In short, my English muffins came out bad, but there's too many variables to determine just where exactly I went wrong. That being said, I'm not discouraged. I will try making English muffins again, but this time, I'll be a bit more diligent in my work. Breadmaking is an art, and it's something that I'm learning to enjoy.

One thing that surprised me was just how long breadmaking takes. To activate the yeast takes about 15-20 minutes, and then once mixed with the flours and other ingredients, the dough needs to be put aside to rise for about 2 hours until its doubled in size. But, there's more! Once the dough is kneaded and shaped, the resulting loafs have to "proof" for about an hour to double in size. It literally took me all day to make the English muffins that I'd intended to have for breakfast. Oh well. Still, nothing beats fresh made bread, however it comes out.

Thank you for reading this post and please don't forget to share, comment, and subscribe!

Sunday, June 19, 2016

Juneteenth

Happy Sunday, dear readers!

While the rest of the country celebrated Father's Day, my family did not.

We celebrated Juneteenth instead.

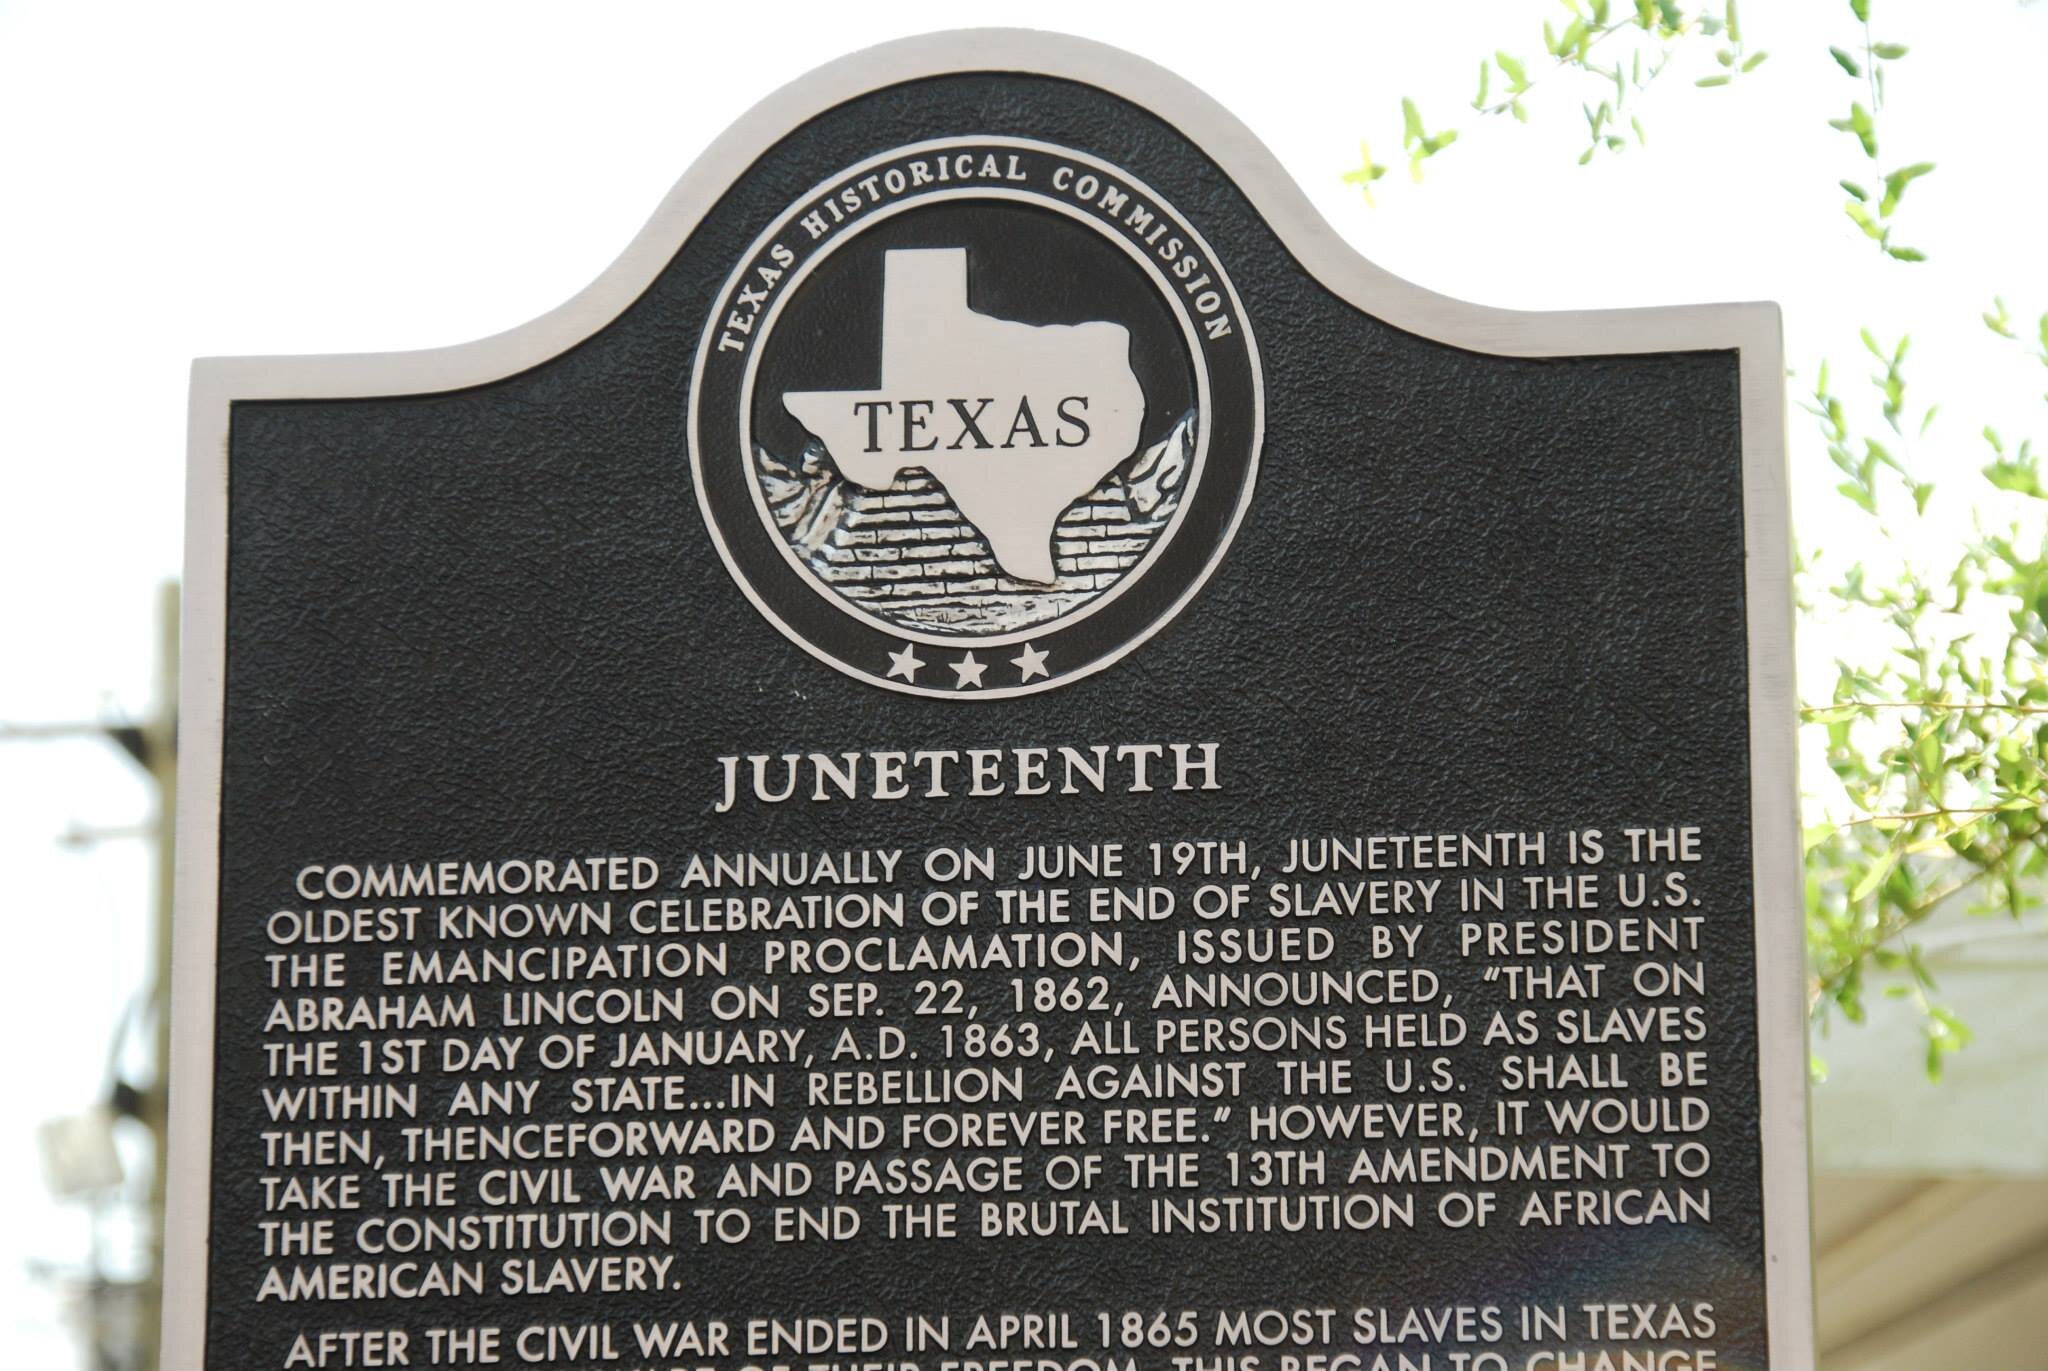
A brief explanation of Juneteenth. Pic found here


Juneteenth is a Texas holiday commemorating the emancipation of the Black slaves in the state. The name is a combination of June and nineteenth, the date the emancipation was first celebrated formally in 1865. It was my husband who introduced me to this holiday in 2012, and he told me how when he was a younger man, he used to celebrate the day by eating fried chicken, watermelon with salt, and drinking cheap shitty beer. While his idea of celebrating Juneteenth came from the racist tropes of Blacks that he'd grown up with in Texas, I didn't mind eating fried chicken and a watermelon on this day. I'm not a big melon eater, but I've had watermelon every year on Juneteenth since 2012, even if beer and fried chicken were out of the question.

I did my bbq-ing last night. Pic found here


What surprised me most about my husband's choice of celebratory foods was the watermelon with salt. I knew about watermelon being seasoned with sugar (my grandma did that), and chili powder (the Mexicans did that), but not salt. Apparently, this is something only Texans did as my husband did not recall anyone in Louisiana seasoning their watermelons with salt (they did pickle the rinds, however). I didn't particularly care for the taste of salt and sweet watermelon the first time I had it, but I've grown to tolerate it.

Forget Father's Day. Sure dads are important, but the holiday has become so commercialized that it's been rendered worthless. Thank goodness my husband isn't crazy about parent-themed holidays. At least with Juneteenth, it was a holiday we could spend together as a family and somewhat relate to since both of our respective peoples (Irish and Serbs) had been utilized as slave labor over the course of history by various Western European powers. Today happened also to be the hottest day on record (a whopping 115 degrees Fahrenheit!), so it was a good day to stay inside and feast on leftover London Broil, baked beans, and watermelon. I had to kick myself out of bed super early so we could go to church early in the morning in order to get our Sunday obligation to attend Mass out of the way before it got too hot out.

And that was how I spent my Sunday.

Thank you for reading this post and please don't forget to share, comment, and subscribe!

Saturday, June 18, 2016

Return of the BBQ Queen

Greetings, dear readers!

It's been a busy week, but tonight I'm pleased to make an announcement: I have resumed my seasonal role as the BBQ queen of Arizona!

As I've written, I've had the cooking bug for a few weeks now. On Friday, I spent the afternoon diligently cleaning the inside of my trusty little BBQ to get it ready for the summer and the heavy use it will undergo. Cleaning the grill of what had to have been a few years worth of ash buildup made me wish I had a larger grill for some of my more ambitious projects (like baking!), but until I can afford a larger grill, this bitty broiler will have to suffice.

The grill is ready


Tonight's debut dish of the season was none other than a London Broil. We bought one on sale from the store about a week ago, and now it was time to eat it. I looked up a few recipes online for cooking it, but in a twist from my usual protocol, I did not want to make a marinade for the meat. I decided that I would score the surface of the meat, but I wasn't sure what else to do in addition to that. I then found a video where the cook massaged the meat with some olive oil, garlic, salt and pepper before throwing it on the grill, and I decided that would be the extra step I needed. I tend not to marinate my London Broils because I feel like they don't add anything to the overall dish that can't be achieved through a low-n-slow cookdown on the grill.

London Broil


Before grilling the meat, I lit the coals using an old propane camp stove, and carefully transferred the hot coals to the barbecue one by one with my tongs because there was a strong breeze blowing in and I didn't want to start a fire in my yard because it's been so dry here. I then threw in several handfuls of hickory and pecan woodchips which I'd been soaking in water for a few hours so they were nice and moist and ready to smoke. I've come to appreciate the use of woodchips, since they enhance the flavor of the meat quite well. Finally, I plopped the meat onto the grill and let it do its thing. I only periodically would come back out to turn the meat, since I was doing this brisket-style in preparation for 4th of July, when I will make a REAL brisket.


Beans on the grill. Kickin' it old-style (note: I have no idea why the image is rendering sideways. It was taken right-side up!)


After about an hour or so, I called the broil done and brought it in. Since my husband asked me to make baked beans to go with the broil, I then proceeded to grill up some onions, peppers and sausage to put into the pot with the cans of baked beans. I was gonna do this old-school and cook the beans on the grill since the heat was already there and I REALLY didn't feel like heating up the house after hearing that it would be over 110 degrees Fahrenheit tomorrow. After adding some fresh coals because the old ones were pretty burned out, I placed my cast iron pot full of baked beans on the grill to cook. Some periodic stirring, and they were good to go after an hour or so. BBQ baked beans aren't bad. It feels like I'm camping when I cook them on the open grill.

All done! Look at that meaty goodness!


When my husband got home from work, he just about had a foodgasm while eating my broil. I was a bit worried that I'd undercooked it because while London Broils have to be pretty rare to be edible due to the nature of the cut, I didn't want my broil still mooing while I was cutting it to eat. Fortunately, my husband called it just perfect and had a healthy helping before going to bed. He had a bit of the beans too, but the broil was far more preferable. I, on the other hand, was glad it came out great. I'm very careful about not undercooking or vulcanizing food so as to render it inedible.

I'm very encouraged by this first creation of the season. I wonder now what other creations I can make for my family. Maybe I'll bake something next. That's something I've been wanting to try for a while.

Thank you for reading this post and please don't forget to share, comment, and subscribe!

Sunday, June 5, 2016

Adventures in Cooking: Glazed Pork Chops

Happy Sunday, dear readers!

My creation for tonight's dinner: glazed pork chops with a green bean and insta-mash potato side dish


Since today was Sunday, it was my day to cook. I've had the cooking bug now for a couple of weeks, but in spite of the number of cooking videos I've spent the evenings binge-watching, I just did not know what to make. I was leaning strongly towards spaghetti sauce, especially since there are a number of vegetables in the fridge and in cans that need to be eaten, but it was too hot and I felt too lazy to make them. Boiling spaghetti is quite the heat producer too, though I managed to get around that by microwaving the noodles with some water in a bowl.

However, we did buy a pack of pork chops on super sale at the Mexican grocery store earlier this week. It had been a while since we'd eaten pork chops, so I figured I'd make something with these. As much as I love beef, I need a break from the stuff periodically. Since I haven't had the time or energy to clean the grill, there would be no marinate and BBQ for these pork chops. Instead, I decided to try glazing them after I saw a picture that a friend of mine posted to Facebook about her delicious-looking attempt at making glazed pork chops for her family.

While sweet pork chops aren't really my thing, I decided to give them a try because my husband advised me how good brown sugar and pork chops are together. I scoured Pinterest for a few recipes and found some that had some appealing ingredient combos, but none were to my liking overall. I knew I would need brown sugar and molasses for sure, but I didn't know what else I could add. After looking at a few different recipes, I had a basic idea of what was needed, but I would ultimately be pulling the recipe off the top of my head.

For the rub, I mixed up some salt, pepper, paprika, garlic and onion powders, and a substantial amount of brown sugar. The end result of the rub was sweet but with a spicy punch. I decided to add the molasses while the chops were being caramelized in my handy cast iron pan. Since there was already kind of a sweet crust on the chops from the sugar, I only drizzled a little molasses onto each side of the chop. My big fear was that I would vulcanize the chops (I'm pretty good about judging how well they've cooked on the BBQ grill, but frying can be a little tougher), but after my husband sampled a bit of my work, he was delighted by how tender they were and how well the flavors melded together. The baby liked them too, since they were tender enough for her 2.5 teeth to chew on.

I was overall pleased with my work too. While I don't remember exactly how much of each ingredient I used to make them, this glazed pork chop is definitely a keeper!

Thank you for reading this post and please don't forget to share, comment, and subscribe!

Wednesday, June 1, 2016

The Couscous Challenge

Good evening, dear readers!

Yesterday, I came across a video on Youtube of British chef Kerryann Dunlop making a Turkish-inspired couscous salad. After watching it and realizing I had pretty much all the ingredients needed to make this dish, I decided to answer her call challenging us to make this recipe. I decided it was gonna be for dinner.

Here's the video:


And here's my take on it:

Even my husband loved it, and he's not crazy about couscous! (note: I have no idea why the image is rendering sideways. It was taken right-side up!)


There were a few deviations that I took when making the couscous salad. I didn't have smoked paprika, just the regular kind. I also didn't use chili peppers, nor did I feel like opening up a can of chili tomatoes to compensate, but I also added three large cloves of garlic and used different proportions of fresh herbs based on what I had available and could tolerate eating (I'm cool with cilantro and parsley, but I'm not much of a mint eater so I used the littlest bit of yerba buena I could cut off since that was the only mint I have. I'm not sure exactly what type of mint yerba buena is (I think it might actually be spearmint. It certainly smells like it), but it's a common herb used for teas by the local Mexican population. A neighbor gave us our yerba buena plant a year ago and it has gone absolutely gangbusters in the garden). I also didn't have any tomato puree like what the recipe called for, but I think in this regard it would have ruined the dish.

This is not the first time I've had couscous salad. A few weeks ago, I cooked up a box of couscous we'd been given a few years ago and added my usual salad staples of tomato, cucumber, garlic powder, olive oil and vinegar. I won't say I fell in love with couscous, especially since I'd never eaten it in my life prior to then, but I genuinely liked it. I make it a point to now always have a box in the pantry for when I feel like having some.

The first couscous meal I ever ate. Certainly not as fancy or colorful as tonight's creation, but it was good enough to get me to make it again


Overall, I was quite pleased with the way this dish came out. Next time I make this, I'll add some chicken to it since I think the two will go well together. My husband was also delighted with the result since he'd eaten his fair share of couscous in the past, but had grown tired of it as he got older and stopped hanging out at the Sufi mosque where he was introduced to the dish by some Palestinian congregants. The one thing he griped about was that it was hard for him to gum the cucumbers, but everything else was chewable for him. Periodontal disease in his 40s robbed my husband of his teeth, but he can still eat most foods and speak without impairment. The only things he really can't eat are nuts and anything really tough or hard since teeth are required there. This has proved to be a blessing for the baby cuz if my husband can't eat the food, neither can she.

Thank you for reading this post and please don't forget to share, comment, and subscribe!

Wednesday, May 25, 2016

Adventures in Serbian Cooking

Greetings!

For the last few days, I've been binge watching Serbian-language cooking videos on Youtube. I've had a serious cooking bug burrowing its way through my consciousness, and so I consulted the bakas (grandmas) of Youtube for some ideas on what to make.

Since its only gonna be in the 80s this week, I thought about baking something. It will either be bread or burek. While my husband isn't much of a bread eater, I am. There is one grandmotherly Youtuber whose bread recipes caught my fancy. She calls herself Jelajelena Petrovic and her way of making breads and rolls seemed pretty easy and straightforward. They look absolutely delicious, as is evidenced in the video below.


Since I'm going off of a Serbian cooking video, whats gonna come out of my attempts will vary from the product shown. For one, I may not be able to get all the ingredients she uses in her videos (I don't remember if the Euro mart stocks Serbian cheeses/Bulgarian feta cheese or Vegeta (a common seasoning mix used in Serbian cooking)). Also, the ingredients are measured out according to European specs, where mass is used to measure out ingredients as opposed to volume, which is the American standard. My husband advised me to invest in a kitchen scale for this sort of endeavor, but we can't afford one right now. Thank goodness Google can do conversions for me.

One thing I was pleased to see was how much I understood and could follow along with the videos. I've never been particularly proficient in Serbian, but I remembered the words for ingredients like flour (brasno) and procedural steps like baking (pece). Some words I've never heard before but figured out, like black pepper (bibera) and yolk (zumance). For the words I didn't know, there was a plethora of online Serbian-English dictionaries to be found on Google.

This weekend, I will give one of Jelajelena's recipes a try. I'm looking forward to it!

Thank you for reading this post and please don't forget to share, comment, and subscribe!

Friday, May 6, 2016

The Palacinke

Greetings!

I hope you all had a safe and happy Cinco de Drinko yesterday. Yes, I know it's actually Cinco de Mayo, but what was originally a minor Mexican holiday celebrated locally in the city of Puebla where the famous battle took place, has been co-opted blown up into an event for the express purpose of pushing cheap, crappy booze here in the US. This is why I call it Cinco de Drinko. It's like a boozy version of President's Day.

Everyone's Mexican for a day on Cinco de Drinko!


While the rest of the nation made fools of themselves getting wasted on Mexican food and margaritas, I decided to try out my grandmother's recipe for palacinke (pron. pa-lah-cheen-keh). Palacinke are kind of like flat pancakes, very similar to crepes. I hesitate to use the word "crepes" as an analogy because to me, palacinke have more char to them than the light-colored crepes. This could just be because of the way my grandmother made them, as hers always had some char to them (she considered light colored palacinke to be underdone).

In a major departure from my usual protocol, I actually followed the recipe as it was given to me! I suppose this was probably because I was making it for the first time, and I didn't want the batter to come out too thick (palacinke batter is thin). I had tried making palacinke on my own in the past from memory, but they never seemed to come out quite like how I remembered them. Maybe now, I had a chance!

After combining the ingredients, I pulled out one of the cast iron skillets. My grandmother makes her palacinke using a Teflon-coated skillet, but since we don't have one anymore (the one Teflon skillet we had was used until the Teflon literally started disintegrating off the surface of the pan!), all I had to work with was cast iron.

The first palacinka


My husband likes to say that the use of cast iron cookware is a verifiable demonstration of one's cooking skills. Despite some recent successes in the kitchen of late, on this family recipe I failed miserably. Even though I poured some oil into the skillet, the rough surface caused the batter to adhere to the bottom of the skillet and thereby completely destroy the palacinka (singular version of palacinke). Even after I changed skillets to the smaller, enamel covered iron skillet that I usually use for frying eggs, I just could not get the resulting palacinke to stay together or fry to the point where it was cooked, but not crispy (properly done, palacinke are flexible enough to roll up). I changed the heat levels, the amount of oil and batter in the pan, and I just could not get them to come out the way my grandma made them. If they stayed together, they were hard and crispy, not soft and flexible like how she made them.

It would start out like this in the skillet...

...And then turn into this crumbly mess every time I tried to flip it!


Despite this disappointing first batch of palacinke, they were as tasty as I remembered. They tasted lovely with some raspberry jam. My husband was quite pleased with them, and encouraged me to try making them again. I suppose cast iron is not the most optimal cookware for making palacinke, but until I can find a small Teflon pan, this is all I have to work with. Maybe it is a matter of finding the right heat settings or oil-to-batter ratio. My grandma wasn't specific on what level of heat she used, but she does have a gas stove (ours is electric) in addition to the cookware differences. This will make for an interesting journey-the quest for the perfect palacinka!

Thank you for reading this post and please don't forget to share, comment, and subscribe!

Tuesday, April 26, 2016

The Burek

Happy Monday, dear readers! I hope your weekend went well.

Recently, I decided to call upon my Serbian roots and make some traditional food. The fillo dough I bought at the Euro mart a few weeks ago was sitting in my freezer and needed to be utilized. When she was here, my grandma gave me her recipe for making cheese pita, a kind of savory pie that is a staple of Serbian cuisine. Though she always made her dough from scratch, her advanced age had caught up with her and my grandmother was now using fillo dough to make her pitas.

Fillo dough, out of the box. It's supposed to be available in major grocery store chains, but I have yet to find them outside of the Euro mart here. Pic found here 


Though I understood her reason and rationale for doing so, this admission saddened me because my grandmother's pitas were always doughy and thick, which was what I came to understand pita as being (though to make things especially confusing, pita can be made with thick or thin dough and that pita, gibanica, and burek are all mostly interchangeable terms to describe savory pies in Balkan cuisine). However, when she made burek, that was the only time she used fillo dough for something that wasn't a pastry.

Burek, like pita, is a savory pie from the Balkans. Just about every country and dialect there has a name for burek, and it is usually filled with cheeses or meats (though vegetables like spinach are common). Burek can be rectangular, round, horseshoe, or spiral shaped (the latter is common in Bosnia). It is usually made with dough stretched thin that can be either handmade or from fillo.

This is how I remember burek from my childhood. If fillo dough is not used, then the dough is handmade and stretched very thin over a large surface area and folded over with the fillings. Pic found here


Since my husband positively despises cheese, I decided to make meat burek. I remembered there was a Serbian deli a few towns over from where I grew up in the Chicago suburbs, and to this day I remembered how good the owner made his meat burek. He used ground beef seasoned with a little salt, pepper, and a pinch of paprika. I don't remember if he used anything other than beef, but the taste has remained burned in my memory all these years. This would be a good way to use up my fillo dough.

After I let it thaw in the fridge for a day or so, I took out the fillo dough along with some canola oil, and a pastry brush. When making these pies, it is essential that the dough be greased with each layer.

I started off by cooking the meat filling first. We had a leftover pound or so of ground beef that needed to be eaten, and I added in my customary chopped onion and garlic for flavoring. I then added some salt, pepper, and a touch of paprika.

Filling in progress


When the meat was finished, I turned on the oven and as it warmed up, I set about assembling the burek. I had no clue how fragile fillo dough was until I began unraveling its sheets from the roll and layering them in the pan. The sheets were tearing and literally disintegrating in my hands, no matter how carefully I picked them up. My grandmother and mom made handling them look so easy! HOW?!

After oiling each sheet and before laying the next one down, I added my meat filling after every few layers. With the fillo dough fast becoming dry, I finished off the package by just throwing on the last few sheets, oiling them up and putting them in the oven. My grandmother's baking instructions were just to let the pita (or burek, in my case) bake at 350 until golden brown, which I figured wouldn't take that long.

FINALLY assembled and ready to bake!


Despite me periodically opening the oven to check on the burek (our oven does not have a light), it took almost an hour and a half before the top looked even halfway tan, but as I would discover when I cut the burek to eat, I had overcooked it. The bottom was kinda burned, the middle layers were alright, but the top layers were dry and the whole thing was quite greasy from all the oil I'd slathered the fillo sheets with. Despite the amount of meat I made, I felt like I hadn't used enough for this dish to turn out as good as I remember it being.

Finished

My first burek. Needs more meat and less time in the oven


Even though I was disappointed by the way this burek turned out, it was a learning experience in a number of ways. Fillo dough is fragile and dries out very quickly, so I have to figure out an easy way to keep the layers moist and if there is a way of handling the sheets so that they don't disintegrate as I'm handling them. I could also take a stab at making the dough from scratch, although my counter is tiny and I may have to get creative about space. Also, I feel like my dough to meat proportions were off and that the next time I make burek, I'll see how well 2 lbs of ground beef works with a package of fillo dough. I'll also use a different pan next time to see if the kind of pan I bake with has an effect on how the burek turns out.

It may take a while and a few bombed bureks before I finally get it right, but for better or worse, I don't give up. To make a good burek is an art, one that I aim to achieve.

Thank you for reading this post and please don't forget to share, comment, and subscribe!

Thursday, April 14, 2016

A Trip to the Euro Mart

Good evening, dear readers.

Today was a day I had been looking forward to all week. This past weekend, in the aftermath of my family's visit, I was googling where I could find Serbian beer for sale in town, and lo and behold, I stumbled across a Euro mart. Owned by a Ukrainian family, it was located on the east side of town and sold all kinds of goods from Eastern Europe. This included beers from Russia, the Ukraine, the Balkans, and Poland. I wanted to go and check it out, so today after my husband got his medicine, we went and took a friend with us. She hadn't seen our cholomobile yet and needed a ride home, but she didn't have any plans for the afternoon and tagged along with us.

The helpful proprietress and her wares. Pic found here


Upon arriving in the strip mall where it was located, I thought immediately of the Serbian delis I used to visit while growing up in Illinois, as well as a few up in Phoenix that I've frequented in my old life. There were mineral water and beer advertisements in the windows, as well as a sign proclaiming how good the gyros were. Inside, the shelves were packed with Russian and Polish goods as well as jars of pickled stuff. I literally was like a kid in a candy store! It was not cheap, however. Compared with the delis I've been to, the place was a racket! But, it's a specialty store for a community that isn't really big, so I can deal with the prices because this is the reality of the Slavic community here in southern Arizona. At least the store accepted EBT.
Russia's largest beer company, with all its varieties. Pic found here


My husband got a few jars of pickled herring (yuck!) and I got some fillo dough to make pita as well as some Russian cookies for the baby. I also fulfilled the mission that brought me to the store in the first place and bought a few bottles of beer. I bought a bottle of Baltika (grade 9) which is a Russian beer brand, and two Serbian beers that I remembered from my childhood: Niksicko (actually, they're from Montenegro) and Jelen. I saw some other beers from Bosnia and Croatia as well as plenty from Russia, Poland and the Ukraine. Again, these bottles of beer are not cheap (my Serbian beers went for almost $3/bottle and the Baltika was like $7 cuz it was a pint as opposed to a 10-oz bottle), but until I can find them elsewhere in town for cheaper (I don't think you can order them online), a once-in-a-while trip here when we have money is ok for sampling. The proprietress recommended the Baltika as her favorite beer. I was surprised to see how many varieties (or "grades") the brand puts out.

This is what I had to drink. The neon green color captured my attention. The label says "tarhun" and it definitely tastes different than your average American carbonated beverage. Supposedly, it was originally created in a Georgian pharmacy when a pharmacist mixed some carbonated water with tarragon syrup. Pic found here


We had lunch at the Euro mart. My husband wanted to try the gyros, and our friend had never even heard of them. So, we ordered some. I was a little disappointed by the inclusion of lettuce with the gyros (I'd never heard of such a thing prior to coming out to Arizona because all the gyro places in Chicago never did that. I still think it's an abomination), but the rest of it was good. It wasn't bad price wise and to wash it down, I had a bottle of Russian pop. It was neon green in color and tasted like anise, but the English translation of the label listed it as being made from tarragon seeds and vanilla extract. It wasn't bad, just different. I almost picked a bottle of kvass to drink, but decided lunchtime was too early to be drinking alcoholic beverages, even if they're low alcohol. Our friend had some of the gyro and was impressed with it. I told my husband next time we came that we would have the cabbage rolls ("sarma" in Serbian). I wanted to see how they were made as compared to what my grandma made when I was growing up.

Overall, my thoughts on our trip to the Euro mart were positive. Yes, it's expensive, but it's a specialty store catering to a small community. I won't let the prices stop me from coming here when I need stuff like fillo dough or Slavic beers, just because they're things I can't get elsewhere.

After we paid and left, we took our friend grocery shopping so she could get some needed items and then took her home. She was grateful for the errand and was immensely pleased with our car.

Thank you for reading this post and please don't forget to share, comment, and subscribe!